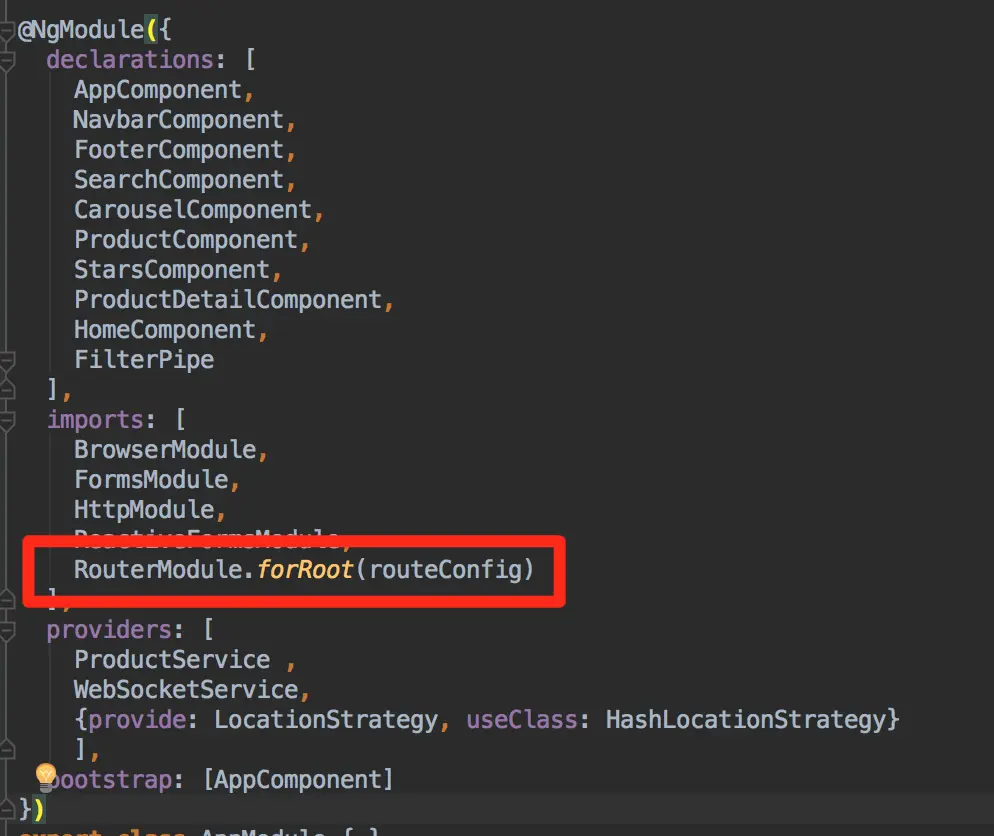
这章说一下angular的路由,我也就紧急学了下,实际上在ionic里都没用到这方面的知识,ionic把路由都封好了
先说angular路由怎么引入,一开始new出来的angular项目它路由帮你配好了,但看要看app.module.ts里面
- 首先最上面要引入路由模块
1
| import {RouterModule, Routes} from '@angular/router';
|
- 然后在ngModule里面加点东西

- 这个routeConfig需要自己定义,类型Routes,里面就是angular路由配置
1
2
3
| const routeConfig: Routes = [
{path: '' , component : HomeComponent},
]
|
当然路由配置也是可以抽出来的
路由配置简单介绍
- 常用跳转
1
2
3
4
5
6
| const routeConfig: Routes = [
{path: '' , component : HomeComponent}, //path为''首页即是
{path: 'chat',component: ChatComponent,},//访问首页地址+/chat 即能访问到chat组件
{path: 'au/:id',component: AuComponent},//路由param传参
{path: '**',component: Code404Component} //不能匹配的路由由 ** 匹配
]
|
其中第三个路由传参的接收方组件想要拿到参数就需要多加点
a. 首先引入
1
| import {ActivatedRoute, Params} from '@angular/router';
|
b. 并在constructor里注入这个路由服务
1
| constructor(private routeInfo: ActivatedRoute)
|
c. 获取param参数
其中有2种方式获取param
第一种是snapshot 参数快照
1
2
3
4
| ngOnInit() {
this.productId = this.routeInfo.snapshot.params['id'];
}
|
但有一个问题
如果已经请求 localhost:4200/au/6 后,再请求 localhost:4200/au/8 ,相当于同路由跳转只是参数不同,那么第二次拿到的param数字还是第一次的6
原因
constructor创建时会只创建一次ngOnInit,所以this.routeInfo.snapshot.params[‘id’]的值会不变
所以更多的获取参数更推荐第二种参数订阅的方式
1
2
3
| ngOnInit() {
this.routeInfo.params.subscribe((params: Params) => this.productId = params.id);
}
|
怎么跳参数都是对的用第二种
子路由
只是一层路由明显满足不了开发需求,可以再配置子路由
1
2
3
4
5
6
7
8
9
10
11
12
| {
path: 'product',
component: ProductComponent,
children: [
{
path: 'childA', component: ChildAComponent
},
{
path: 'childB', component: ChildBComponent
}
]
}
|
但是子路由光这样还是不行·
在父组件html里加跳到子路由的按钮时
1
2
| <a [routerLink]="['./childA']" >销售员A</a>
<a [routerLink]="['./childB']" >销售员B</a>
|
注意这里不能加/ 因为斜杠指向根路径, ./才指向相对路径
重定向路由
使用 redirectTo
1
2
3
4
5
| const routes: Routes = [{
path: '',
redirectTo: 'home/6',
pathMatch: 'full'
}]
|
辅助路由
就是一个插座,辅助路由通过不同的outlet配置,让页面的router-outlet标签,显示不同内容
路由配置
1
2
3
4
5
| const routes: Routes = [{
path: 'chat',
component: ChatComponent,
outlet: 'aux'
}]
|
引用插座的html代码
1
2
3
| <a [routerLink]="[{outlets:{primary:'home/2',aux:'chat'}}]" ></a>
<a [routerLink]="[{outlets:{aux:null}}]" ></a>
<router-outlet></router-outlet>
|
应该会有人问第一行的primary干嘛的
辅助路由的改变只会改变插座的内容,不影响主路由
比如原本路径是
http://localhost:4200/home/0
现在如果[routerLink]=”[{outlets:{aux:’chat’}}]”的a标签被点击,改变的只是辅助路由,路径会变为
http://localhost:4200/home/0(aux:chat)
只有加上primary:’home/2’,主路由才会一起变,变成http://localhost:4200/home/2(aux:chat)
同主路由间跳来跳去想把辅助路由干掉,用第二行即可
####路由守卫
只有用户已经登陆或者拥有某些权限才可进入的路由
canActive
- 写一个守卫类,继承 CanActivate 接口
1
2
3
4
5
6
7
8
9
10
| import {CanActivate} from '@angular/router';
export class LoginGuard implements CanActivate {
canActivate() {
let loginedIn: boolean = Math.random() < 0.5;
if (!loginedIn) {
console.log('用户未登陆');
}
return loginedIn;
}
}
|
这是CanDeactivate 与canActivate不同的是它要离开某个组件就需要保护那个组件,建立也要注入那个组件
1
2
3
4
| export class UnsaveGuard implements CanDeactivate<ProductComponent>{
canDeactivate (component: ProductComponent) {
return window.confirm('是否离开');
}
|
这两个返回都应该是boolean型
2. 在路由配置里加配置
canActivate 在路由配置时可以配置一个数组,angular会一次调用数组中的项,一旦某个返回false,则会终止登陆操作
1
2
3
4
5
6
| {
path: 'product',
component: ProductComponent,
canActivate: [loginGuard],
canDeactivate: [UnsaveGuard]
}
|
服务里加上该服务
1
2
3
4
5
| @NgModule({
imports: [RouterModule.forRoot(routes)],
providers: [LoginGuard, UnsaveGuard],
exports: [RouterModule]
})
|
路由守卫 非常重要 。再给个我网上找的参考文章
http://blog.csdn.net/qq451354/article/details/54017466
